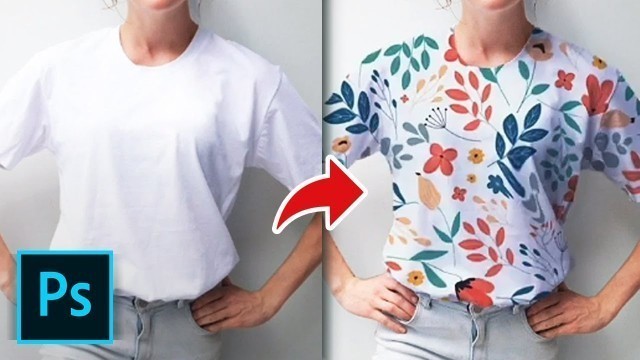

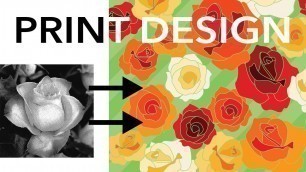
'In this tutorial, you will learn How to Add Patterns/Prints to Clothing in Photoshop. If you want to prepare a mockup of a shirt and see how that’s going to look, here’s one way to make that happen in Photoshop. It’s best to have the article of clothing in white or the color that you want it to be, but make sure it doesn’t have any graphics of its own. We’ll start by scaling and rotating the pattern that we have so that it fits the entire piece of clothing. Feel free to do all the color editing at this point too, if you need to. Now, using the selection tool of your choice, select the shirt and create a mask with the selection on the pattern layer. In other words, cut out all the unnecessary bits that won’t be on the shirt. We’ll use select and mask. To find out more on this, check out our tutorial on how to use masks and select and mask tool. Now, to make the Pattern look like it Flows with the fabric, it must be warped into place. Use the Liquify Tool to bring in the edges of the pattern, making it look like the pattern wraps around the piece of clothing. Go to Filter - Liquify. We also have a tutorial that focuses on Liquify tool. The last step is to blend the pattern into the original image. In this example, we change the blend mode to ‘Multiply’ and lower the Opacity to 90%. Next, add Shadows and Highlights from the original piece of clothing. Duplicate the Background layer and place it on top of the fabric layer. Right-click on the layer and select “create Clipping Mask”, then change the Blend Mode to ‘Multiply’. To add Highlights, duplicate the Background layer and clip it to the fabric, just like the previous layer. This time set the Blend Mode to ‘Screen’. If needed, adjust the Brightness of this layer by using a Levels Adjustment. Press CMD+L. Drag the black point slider to the right until the layer only appears over the Highlights. While this is not a novice level of task, this is one professional way to do it! Depending on the time spent, you can have a result that ranges from a mockup to a professional level! ❓
Tags: photoshop tutorial , howtech , photo editing , photoshop cc , add patterns to clothing in photoshop , add prints to clothing in photoshop , create pattern on clothing in photoshop , add custom patterns to clothing in photoshop , apply patterns to clothing items , add design to clothing , add a design to a shirt in photoshop , change clothing texture in photoshop , put a logo on a shirt , design a floral pattern for fabric in photoshop , make a t-shirt mockup in photoshop , photo effects
See also:

!['[For Honor] How I Customize Lawbringer ( Rep 70 Fashion)'](https://cdn-img01.kidsbigvlog.com/images/11-m/420/420586_m.jpg)


comments